Showing posts with label Stone. Show all posts

Monday, June 26, 2017

Zeroscaping Is So Hot Right Now!


First things first, there is xeriscape and zeroscape which are often used interchangeably but actually have different meanings.

Zeroscape typically refers to a mostly concrete, stone or gravel in place of a traditional landscape design. It can even mean that no landscaping has been done.

Xeriscape is a method of landscape design that minimizes the amount of additional water used by combining native plants and trees, as well as rock work, to create beautiful outdoor spaces. Xeriscape designs are especially used in dry regions and areas. To have the most impact with a xeriscaped yard, use trees and plants native to the area.

The above information was supplied from a blog post from Native Trees and Landscape.  For more great information on Xeriscaping check out the website Gardening Know How.

I'm gonna talk about zeroscaping up in here so get ready to...rock. (So sassy!) Okay let's go!


We all have them...those places in the yard where nothing will grow and every time you see it you throw up a little.  The area may get muddy and then all your animals go running through it so they can then run inside the house.  Maybe the area is just an eyesore and you do not know what to even do with it.  Rocks can make it all better.


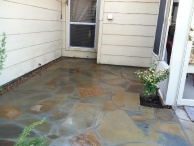
Side of a house which always got muddy.  A variety of river rock, a few boulders, and then some Oklahoma Slabs were used for a walkway.


A tree covered sloped area has been transformed with some Arizona River Rock, Moss Slabs, and a few plants.


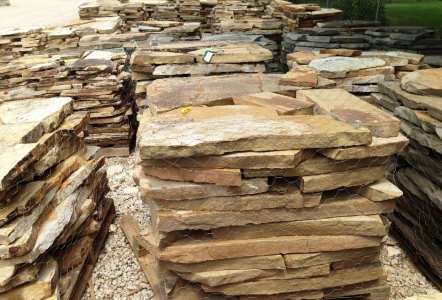
There are many things one can do with rock.  One thing to keep in mind is the larger the river rock - the less coverage it will get.  The smaller the river rock or gravel the more coverage you will get.


An area before being landscaped by Tropical John.

The smaller gravel on the outside is Cinnamon Gravel.  Moss Boulders were used as a border along the river bed which contains Arizona River Rock 2-4".

What a difference!  Tropical John created a creek bed and even put a log in it to give it a more natural feel.


Your neighbors will be so jealous!


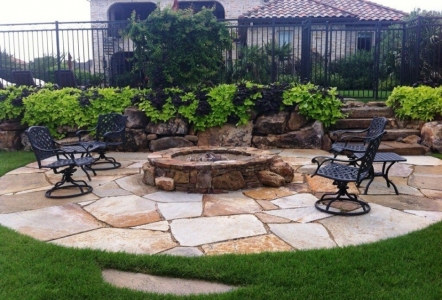
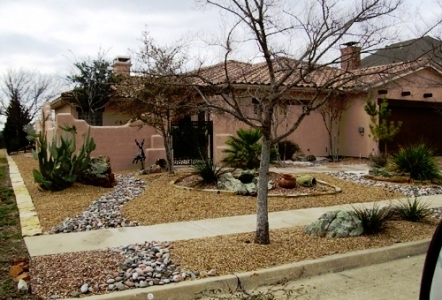
A variety of rock makes a huge and beautiful statement.


The first thing you must determine is the square footage of the area you plan to cover.  This will help in planning your budget.  The gravels and river rocks pricing are based upon the cost of freight - where the rocks are brought in from. The Arizona River Rock ($230/yard), for example, costs more than the Rainbow River Rock ($130/yard) because it comes from Texas.  Don't be afraid to mix different kinds and sizes!  Depending on your project, sometimes it may be more beneficial and cost effective to put a cheaper gravel underneath as a base and then go over the top with the rock you really want which may cost more.  Do a light layer of the more expensive rock on the top and cheaper underneath to keep the cost down.


Now that we have established I am a genius, lets take a look at a few more great ideas for zeroscaping!

Rainbow River Rock filled these massive beds with Moss Boulders acting as edging as well as a few as accents in the bed.

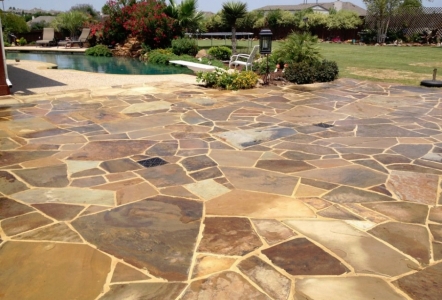
Texas Outdoor Oasis did an amazing job on this customers' home.  Decomposed granite was used on the outer beds, Arizona River Rock 2-4" (keep in mind it has not been washed off yet in this photo), and finally in the center area 1-2" Rainbow River Rock.  This is quite the zeroscape!


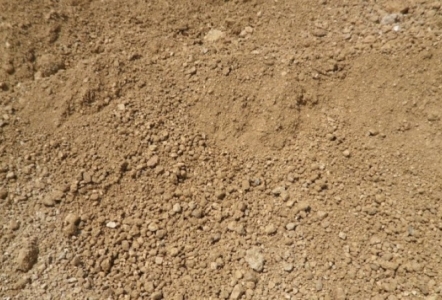
Cut-N-Edge used decomposed granite and then river rock along the are with the steel planters.  Decomposed Granite makes a great ground cover material that is easy to walk on.


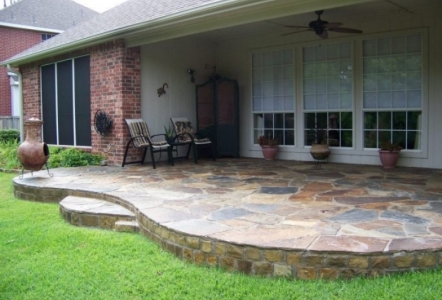
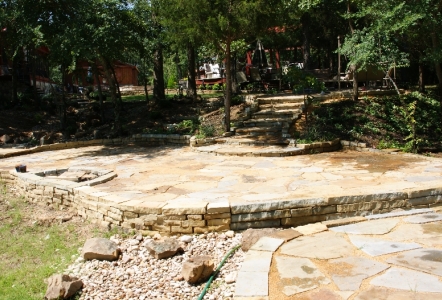
A courtyard area such as this done by Graves Landscaping is also a great way to turn an unsightly area into a beautiful masterpiece!  They used Tejas Gravel around the concrete pads and then Arizona River Rock at the base around the water feature.


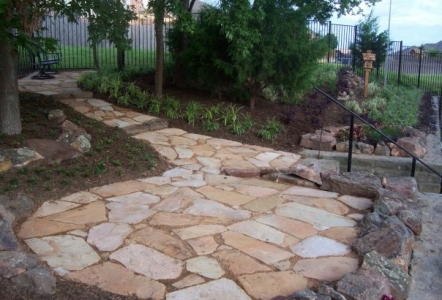
This area was jazzed up by The Grassman using Rainbow River Rock and Oklahoma Flagstone for steps.


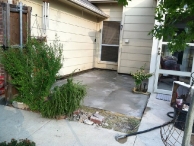
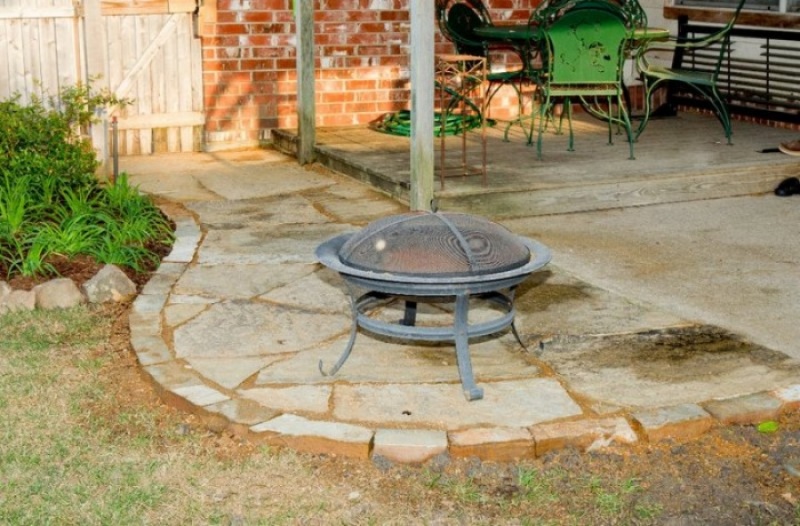
A customer sent me her before and after photos of a backyard project her and her husband completed.

Before

After


After Photo #2


There are many different things you can do to achieve a zeroscape - it just depends on your style and budget.  If budget is an issue, do it in stages. Also remember, there are ways to keep the cost down and still achieve the look you are going for.  Come on by and visit us here at Classic Rock to get more ideas and check out our website which is full of pictures to draw inspiration from. Can't do the project yourself and need some help?  We can help guide you to a landscaper who will fit your needs.  Have anything to add?  Leave your suggestions below.  Otherwise, keep on rockin'!


Wednesday, February 17, 2016

So You Want To Use Stone Edging For Your Flower Beds?


Austin Stone flower beds done by The Patient Gardener.  


Wanting to edge your flower bed boarders and not sure where to start?  You have come to the right place.  There is green metal edging, concrete blocks from places like Home Depot, and then there is stone.  The first thing you must decide is your style.  Do you like straight and symmetrical?  Rustic or more natural?

Moss Boulders installed by Tropical John.


There are many different looks that can be achieved by using stone.  Having a budget in mind is a great way to begin.  Once you decide to take on this project, measure the linear length of your beds.  Does your yard slope?  If so, keep that in mind as well.  Is this a project you plan to do yourself or hire the work done?  Maybe you are unsure and want to check into cost?  There are a lot of factors to consider so lets break it down.

Knowing the length is the first and most important step when considering edging your flowerbeds.  Once you have the linear footage, next comes the type or rock or style you prefer.  Some like to match the stone on their house (if there is stone on the house).  That is usually a good idea but does not have to be the only option.

CHOPPED/LEDGE STONE AKA "THE ONES THAT LOOK LIKE BRICKS"

*2,000 pounds = 1 ton*                      *1 pallet weighs roughly 1.5 - 2 tons typically*

Austin 4"x 4" 

Chopped or Ledge Stone are the familiar looking rectangle stones.  There are many different colors and sizes.  The standard and most popular size is a 4"x4" which means the stone is 4" tall and 4" wide and the lengths of the stones all vary.  If a stone is too long, you can break them.  We sell the stone by weight (sold by the ton).  You do not have to buy a whole ton.  Each pallet's weight varies but is normally between 3,000 and 4,000 pounds (1.5 to 2 tons).   We also have 6" sized stone as well meaning it will stand 6" tall but still be 4" wide with varying lengths.  There are various types of cuts and other sizes too but lets just stick to the basics for now.

Austin 4"x 6" (6" tall and 4" wide)


How much will you need?  Great question!  The quantity of stone you will need depends on the following:

  • How many linear feet do you have?
  • What type/kind of stone?
  • Which size of stone?
  • How tall do you need your boarder?

Some types of stones are heavier than others due to their density.  So a sandstone rock will weigh less than an equal size piece of quartzite or granite.  Due to this factor, heavier the stone, the less coverage it will have.  Also, the taller/larger the stone (a 6" tall stone versus a 4" tall stone) the less coverage but it will stand taller.

General estimate for coverage for a 4"x 4" stone - roughly 100 linear feet per ton.  A stone which is  6" x  4" will roughly cover 80 linear feet per ton.  These estimates are for one layer only and again, may vary due rock's density.  (Austin Ledge Stone is a little lighter in weight/density so it tends to get more linear feet per ton than that of Oklahoma Ledge.)

** We do recommend to seal the Austin Stone - especially when used as a bed boarder.  It is a softer limestone and will absorb moisture.  Freezing and thawing weather conditions could lead to the Austin Stone busting apart.  Sealing the top part (sawn smooth part of rock which is exposed to the elements) helps with this problem.  Sealing the whole rock will also help with staining.  Since it is white, it shows a little more as it weathers.  Mud and grass can stain the rock.  But any and all rock is going to weather over time.  Even Oklahoma Ledge that has been down for years will most likely have a bit of green from the grass.  Many people have had Austin Stone as their flower bed boarder for years with no problems.  You can get stone sealers from many hardware shops but a local supplier called DFW Stone Sealers carry a variety of high quality sealers and cleaners for stone. **

If you plan to do this project yourself there are a few things to keep in mind.  First of all, you do not have to mortar the stones.  You can just line them along the edge of your bed and be done with it.  You can break the stones to a shorter length if you need to.  A handy tool to have is a hand grinder and attach a diamond blade.  Score the stone with the diamond blade and then finish breaking it with a hammer.  You can also use a hammer and score the stone to break it that way.

Oklahoma 6" Ledge for the flowerbed edging.  Done by
Cut-N-Edge.


Thinking you would rather have them mortared together?  Be sure to dig a trench and pour a footer.  Mortar the stones but be sure to add weep holes every 6-8 feet so the water can drain from the beds.  Another option is to pour some concrete in the trench just a little at a time and place the stones in while its wet.  Leave the gaps or joints between your rocks free of mortar so you do not have to worry about drainage.  This will just help to keep your rocks in place and will stop weeds or grasses from growing up between the stones.

Since the ground shifts with our North Texas clay soil, if a proper footer is not installed when mortaring the joints of the rock, it will crack.  Over time due to dry conditions, you will most likely have mortar cracks even if a proper footer is installed.  It happens and most often the result of mother nature and time.  It may be years or decades so don't sweat it.  The same is true if you put the stones in the wet concrete.  It isn't for looks, it is just there to keep your rocks in place and deter weeds so who cares!  No one will see your "makeshift" footer.

BOULDERS AKA "NATURAL/RUSTIC LOOK"

There are many other options besides the chopped or ledge stone.  Many people like the moss boulders.  This is a more natural look and is typically a little easier to do yourself.  We have several sizes to choose from.  Creek Rock is another option for a similar look.  We have them in brown and white.  They are all smooth due to the fact the rocks do come from creek beds.

Moss Boulder edging.  Work by The Patient Gardener.
Mix boulders with chopped like Texas Outdoor Oasis did here.  They used Black Colorado Boulders with 4" Fossil Leuders and then added some Arizona River Rock along the front as well.


Another photo of Chopped Stone mixed with Boulders.  Due to the elevation now the 4" Fossil Lueders is stacked 3 high.  Installed by Texas Outdoor Oasis.


Moss Boulders also installed by Texas Outdoor Oasis.


Oklahoma Creek Rock - Set 'em and forget it!  We have flat versions of these too!

River Rock is another great choice for edging.  We carry many different kinds and sizes to give you the look you want.  Stacking flagstone is another option as well.  There are choices out there which will not break the bank or your back.

Cherokee River Rock

Arizona River Rock as bed edging.  Great look installed by Cut-N-Edge Lawn and Landscape.

Cherokee River Rock as the bed boarder with decomposed granite giving a very rustic look.

A nice example of mixing stone.  Here FGO Landscape and Stone used Oklahoma Ledge/Chopped with Moss Boulders.

Flagstone stacked to make a tree ring boarder.  FGO Landscape and Stone did a lovely job.


There are many options with stone as your bed boarders.  It all depends on you and how creative you want to be.  Check out our website www.classicrockinc.com for many more photos and ideas.  Have any cool examples of using rock as a flowerbed boarder?  Please share them with us!

Note: My posts are meant for helpful advice.  I use photos of customers (landscapers and DIY's/homeowners) using our stone and choose based on what I think will help the reader visualize what I am saying.  A link is provided to those landscapers/businesses as a courtesy to both the local businesses and reader hoping to make it as helpful as possible for everyone.  In other words...I am not paid to endorse anyone's business or product!      


Monday, April 13, 2015

Pot Hole Hell - Cheap Tricks To Help Save Your Driveway

We needed the rain this year for sure but it has caused a few...issues.  Besides muddy yards, gravel driveways have taken a beating.  Over time you are going to get potholes.  They are annoying but at some point they must be addressed.  Here is a cheap way to get a handle on the hell hole.

Larger stone typically used as the 1st layer for a new driveway.  Also good for filling pot holes.

First off, something larger sized needs to go on the bottom and then gravel can go on the top. Just pouring in gravel won't do the trick sometimes because it may be too deep.  Have any old leftover bricks?  Any concrete or trash type stuff you can throw in?  If so, do it.  Place the pieces in and arrange them best possible.  
Utility rock can also be used to fill pot holes.

If you don't have any try going to your local dump.  A lot of contractors have no where to keep job leftovers and must dump perfectly usable stone and other materials.  And even if it is the scraps of stone from jobs, those make great pieces to throw in your potholes.  And it is free.  Can't beat that!  
Take a look on Craig's List too.  Some people have maybe purchased too much  and have usable stone at their home they want to get rid of.

Once you have larger pieces of stone/brick/whatever thrown in the hole, then put some gravel on the top to finish it off.  

It will take a little work but it can save you some money.  You will likely need it for when the inevitable time comes where your driveway will need a good haul over.   

Thursday, March 5, 2015

Muddy Yard? Clean It Up With River Rocks!


Arizona River Rock 2-4" at Classic Rock Stone Yard.

This time of year is not only chilly, but can also be very muddy.  Nearly all of us have had to deal with mud in our yards.  This leads to pets and/or children tracking in mud on your nice clean floors.  Guess what?  Stone can help alleviate this problem!


Zero-scaping has become a popular trend due to water restrictions.  This home was landscaped by Tropical John of Rockwall, TX.

Flagstone works well to make a pathway through muddy areas.  But what about larger areas where grass just won't grow?  Two words - River Rock.  Adding River Rock to your yard can help with the mud issues and look fantastic!


Rainbow River Rock 3-5" with Oklahoma Flagstone steps.
River Rock can be used for general coverage of a large or small area, a dry river bed,  flower bed edging, or even in place of mulch in flower beds.  Let's take a look at some examples!


Before...
After...


FGO Landscaping & Stone added Arizona River Rock around their customer's pool.


Nearly everyone has them...ugly places in your yard where things just won't grow.  Tired of looking at this area day after day?  Add something worth gathering your attention.  River Rock and/or decorative gravel can be an affordable way to give your yard a crisp new look.
Native Gravel was used to cover a large area of yard.  It will cover a lot of area
 (162 square feet @ a depth of 2") and is low cost at $75/yard.


The City of Rowlett covered large areas using Rainbow River Rock.

Dry River Beds not only look amazing but can be very functional as well.   They key to a realistic dry river bed is to mix several kinds of river rocks and add different sizes.   A river does not have one size/one color of rock so neither should yours.  


Variety of Rainbow River Rock sizes.  Functional and looks fabulous!

Tropical John builds one heck of a river bed!

Once you have decided on the location of your new river bed, get the measurements.  Figure the length and width of the area.  Now get an idea of how deep you want it to be.  Is there already erosion from running water when it rains?    Here is a breakdown of how to figure the quantity you will need:
  • 2-4" River Rock covers ~80 square feet per ton, 1 layer of rocks deep
  • 1" and smaller we figure by the cubic yard - 1 yard covers roughly 162 square feet at 2" deep
The Patient Gardener used Cherokee River Rock along with Moss Boulders and an Oklahoma Slab as a bridge for this large river bed.

Mix and match colors and sizes to create the perfect design for you. Have questions?  Give us a call 214-771-0002 or send an e-mail. What other ways have you used River Rock?  Sound off in the comments below!


Saturday, February 28, 2015

So You Want A Flagstone Patio?


Beautiful Oklahoma Flagstone Patio done by Graves Landscaping of Rockwall, TX.  

Have you been debating on adding a flagstone patio to your home?  They can be not only beautiful but extremely useful as well.  There are a lot of things to consider before installing a patio of any kind at your home.  Let's get to it!

Massive and gorgeous Oklahoma Flagstone Patio which was installed by local company Darquea Home Improvements.

First and foremost, where is the location of your future patio?  Is is right out your backdoor?  If so, you will want a concrete pad professionally poured first regardless of what you decide.  Whoa, wait, what?!  Sorry but this is the best option.  Flagstone can be put on the top later if the cost is a problem to do it at the same time.  Why concrete?  Because you will want to spray or hose off your patio.  If you use gravel, decomposed granite, or sand...what a mess if hosing it down.  Also keep in mind that kids or pets will be tracking in decomposed granite and so forth as it will stick to shoes when wet!  Gravel will just be kicked around and sand will wash away and create the largest mess you have ever seen.  This is why concrete is so important.  It will make the upkeep little to nothing and cleaning easy.
Before stone overlay on concrete slab.
After the stone has been installed.  Stone work done by The Patient Gardener of Rockwall, TX.

But what about using a base of sand and then putting mortar between the rocks?  You can do this but it will not last.  The ground shifts too much and will crack the mortar.  Plus, the sand under the stone will not hold too long.  Eventually your patio will begin to sink in places.
**This is advice for the North Texas area.  The soil is clay and is notorious for shifting a lot depending on the amount of moisture or rain.**
 It is worth the money to hire someone who can form up and pour a concrete pad where you want it.  They will also need to tie it in to any existing pad you may already have and or the foundation if the patio will run along the length of your home.  Having this done correctly is unbelievably important so you will not run across future problems.  It may be a bit more money than you had originally wanted to spend but believe me, it is an investment you will not regret.  And remember, you can always put the flagstone over the top at a later time in order to stay in budget.

Concrete is not always necessary of course!  Some people may want to extend a patio, create a courtyard, install a patio around a fire pit area, and so on.  There are a lot of different options as far as flagstone choices, joint filler (or the stuff between the stones), and materials to use as a base.  If you are on a budget, no fear, it is still doable.  You can install a flagstone patio yourself or hire it done.  Now, lets talk price and options!
Oklahoma Flagstone and Decomposed Granite fire pit area installed by Cut-N-Edge.

Oklahoma Flagstone with Decomposed Granite done by Graves Landscaping.
Decomposed Granite, Oklahoma Flagstone, and Oklahoma Ledge (used for the edges) make up this cute patio extension with a fire pit.  Installed by Above and Beyond Landscaping.


Something to ask yourself is how much traffic will your patio see?  It is recommended to use at least 1.5" thick flagstone up to a 2" thick flagstone.  Flagstone is sold by weight (the ton).  The thinner it is, the more expensive it is.  This is because you will get more square footage out of the thinner size as it weighs less.

**1 ton = 2,000 pounds**

  • 1" minus Oklahoma Flagstone covers roughly 120 square feet per ton (this should only be used to go over a concrete pad or it may break) $285/ton
  • 1.5" Oklahoma Flagstone covers roughly 100 square feet per ton $265/ton
  • 2" Oklahoma Flagstone covers roughly 80 square feet per ton $245/ton


The coverage is a rough estimate and based on placing them fairly close together.  If you use grass between the joints of your flagstone, you will get more coverage because the spacing will need to be farther apart.  There are other types of flagstone besides the Oklahoma but this has a large variety of colors and textures to choose from and is the most popular.  

Pallets of Oklahoma Flagstone located at Classic Rock Stone Yard in Rockwall, TX.


Once you have measured the square footage of your patio the next step would be getting a base for the flagstone prepared.  Typically the area will need dug out.  Some people rent a sod remover to help with this task.  Whether you need to remove or build up, it is important to have something bordering the edges of your patio to hold the base in.  If you dig deep enough the sod or grass can act as the edge.  If not, you can use something such as metal edging, stone, or pavers for a boarder.   The most popular item typically used for a base is the decomposed granite which can also be used for the joints.    It is sold by the yard (27 cubic feet in 1 yard).  Gravel, sand, and road base can also be used.  (Sand is not the best idea...it tends to run out from under the rocks and your patio will start to sink.) A good rule of thumb is to figure is about 2" deep.

 Decomposed Granite located at Classic Rock Stone Yard.

An area built up with Decomposed Granite and then edged with Oklahoma Ledge Stone.  Oklahoma Flagstone was then placed on top with more Decomposed Granite filling the joints.

Once the material is in the area and spread, tamping it is important.  If you do not tamp it, parts your patio will end up sinking and be un-level.  Having a packed down sturdy base is very important! Not much material will be needed for the joints or in between the flagstone once it is laid out.  Again, decomposed granite is a popular choice.  When it has been sprayed/wet down or rained on, it will actually harden.  It works well since it stays in place a lot better than other materials, not to mention it looks nice!  This is why is also makes a fine base.  Decomposed granite costs more than the sand, gravel, or road base BUT, it is a better choice in most cases.  Decomposed Granite runs about $95/yard where most gravels and sands run in the $65/yard range.

There are other ways to do a patio but these are just a list of the most common and successful ways to make your patio a good solid one.  Need help with or names of contractors?  Give us a
call 214-771-0002 or shoot over an email.  Have any other tricks or tips to add?  Let us know in the comments!